
If your lab is considering investing in a laboratory information management system (LIMS), you might be wondering what exactly the process looks like. Implementing a LIMS is a complex undertaking, but if you know what to expect from such a project, it makes tracking its progress and directing the entire process more manageable.
While many consultants may follow a similar process, at Semaphore, we think it’s important to be as transparent as possible. As we mentioned in our recent post on change management, change can be uncomfortable, especially when you don’t know what to expect. However, if you have a map and directions, and everyone on the team has a clear understanding of the process, you can approach it with less apprehension and more confidence that you’ll reach your desired goal.
After many years of LIMS implementations, we have refined our process to follow these typical steps:
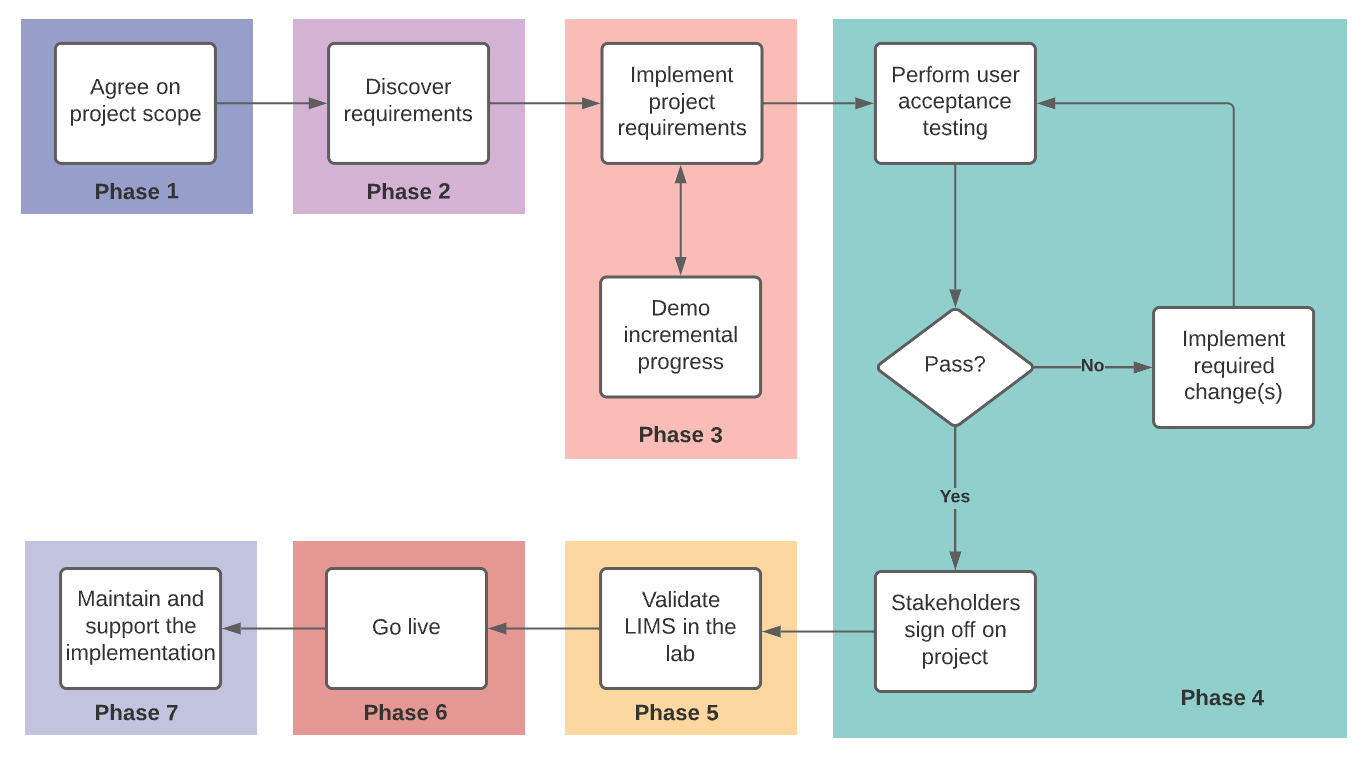
Figure 1. A diagram demonstrating the high-level, end-to-end project implementation process at Semaphore.
1. Initial agreement on the project scope
At the beginning of a new LIMS implementation project, before any work begins, our team needs to gain a basic understanding of the problem the lab wants to solve. We ask questions, such as:
- Why is the lab doing this LIMS integration?
- What are the lab’s long-term plans?
- Does the lab have any hard deadlines?
- What are the lab’s budgetary constraints?
Following this process, we establish the “T-shirt sizing” of the project: will it take weeks, months, or even years to complete? It’s important that everyone involved in the project (the lab’s stakeholders and our team) agree on this sizing — if we cannot reach a consensus, we need to re-evaluate and discuss the project goals until everyone is on the same page. Based on this sizing, we provide an initial rough estimate of what the project will cost.
Once we have an agreement on the high-level scope of work and the sizing, we generally recommend proceeding with a discovery phase or pilot project. During this phase, we can gain a better understanding of the lab’s unique requirements and thus both manage risk and fine-tune our estimate of the cost.
2. Discovery phase
Our goal during the discovery phase is to document the lab’s detailed requirements, provide a high-level implementation design, and create estimates for the total implementation (with a factor of plus or minus 25%). We write recommendations and/or requirements in a vendor-neutral way so that the lab can go with its implementer of choice. These requirements give us insights into the full scope of the project and enable us to provide a more accurate estimate as well as place boundaries around areas of risk.
Within the discovery phase, labs can expect:
- A kickoff meeting for our team to meet key stakeholders and discuss the lab’s goals.
- Two one-hour collaborative working sessions per week. During these sessions, our team maps the workflows and related processes at a high level, usually diagrammatically, and defines a strategy for the work. In some cases, we also provide proof-of-concept demonstrations.
- A detailed discovery report that includes the goals of the project, recommendations for configurations and customizations needed to model all processes, and estimates of the resources and time needed to accomplish these goals and an implementation design. This report can vary in length from 50 to 150 pages and captures the minute details of the lab’s implementation requirements.
On average, this phase takes approximately 80–150 hours to complete, depending on the size of the project. This may sound like a lot of hours, but this is a critical phase and helps to remove project risk and budget surprises. We find it helpful to frame this expenditure to business stakeholders as the percentage of the total expected budget that is for critical risk management. Typically the discovery phase runs to 10% of the then-known total project cost — a high-value activity for a relatively low cost.
A secondary benefit of the discovery process is that it allows the lab to reassess the merits of the project. In rare cases, the discovery process uncovers the fact that the integration goals are either not technically feasible or not possible within the budget or schedule. It’s more economical to figure this out within the first 10% of the budget than in the later stages when considerably more has been spent.
3. Implementation phase
We begin the implementation phase with a signed statement of work (SOW), which references the agreed output of the discovery project as the “known scope”. With that in hand, we usually start with the more risky tasks identified in the discovery phase. These might include fully custom applications or complex integrations with existing infrastructure. By tackling these early in the project, we’ve found that we can remove uncertainty for labs. They can see their requirements come to life and make adjustments as needed.
Our first step is to transfer SOW requirements and information from the discovery report into our project management system. Next, we work through the requirements, comparing the implementation output against the lab’s expectations until every task is complete. We use the Agile+Scrum methodology, working in sprints and providing regular updates on our progress. This approach lets us demo components as they are ready, and iterate and fine-tune them based on the valuable feedback provided by the lab’s team — all of which saves time during the upcoming user acceptance testing phase.
Each project will vary depending on the lab’s needs, but a key part of a successful implementation is understanding the requirements and writing them down so that everyone on the development team and the lab’s stakeholders are clear about the expected result. This includes managing any deviations from the known scope in the project management system — to ensure alignment among all stakeholders for any refinements to the final solution — and communicating any resulting budget or deadline impacts.
As an example, here’s how this phase would look if we were standing up a new LIMS:
- Build the lab’s workflows.
- Build automations for processes such as accessioning.
- Write custom scripts within workflows for items such as calculations, data transfer, and moving to the next step.
- Set up barcoding.
- Build integrations with instruments and other software.
- Build reports.
For a detailed description of this process, read this article in The Journal of Molecular Diagnostics, lead-authored by Semaphore’s own Eban Tomlinson.
4. User acceptance testing
Once the implementation is complete, we (or the lab) prepare a comprehensive list of user scenarios to be tested. It’s incredibly useful to have the people who will use the LIMS walk through each scenario and compare their results to the expected outcomes. As experts in their workflows and processes, they will quickly be able to point out any areas that need fine-tuning.
If a test doesn’t pass, our development team will implement the required change. Otherwise, the lab’s stakeholders accept the project with a sign-off.
5. Validation in the lab
Validation testing of the LIMS is a critical component of a clinical implementation and is performed by the lab prior to going live.
6. Go live!
Some labs prefer to handle the go-live phase in-house. Otherwise, our team is available to assist with moving the LIMS into the lab’s production environment.
7. Ongoing support
After go-live, we move into the support phase. Generally, we handle this with a separate support retainer, depending on the level of support the lab requests. We offer support for the solutions we build for as long as our customers need. In general, we recognize that over time, solutions will need to be updated and modified to meet evolving requirements.
Having a retainer in place ensures we can provide timely access to development resources so urgent issues can be addressed quickly and continuous improvements can be implemented as needed. This keeps your LIMS system both operational and running efficiently.
Final thoughts
In our work with leading laboratories, we’ve found that no two projects are ever the same. Every lab has its own unique requirements and ways of working. However, this roadmap gives us a shared understanding of our work together, so labs can tackle a LIMS implementation or other software project with confidence.
If you’d like to learn more about how we work, check out our post on software development best practices or reach out to talk to us directly.
